For Garmin GPS receivers and Mapsource.
Last updated: 22 Dec 2006
Map display and selection
|
For Garmin GPS receivers and Mapsource.
|
Last updated: 22 Dec 2006 Map display and selection |
Once installed, the Contours package will show as an additional “product” on your Mapsource screen. In this section, we look at how they relate to other data, and can be overlaid to form a composite display on the GPS screen...
About Mapsource:
Garmin's Mapsource programme has been through many incarnations. At the time of writing, the latest version is v 6.8.0. If you own a product such as “Metroguide”, the Mapsource application will have been supplied with it – and is probably out of date already! Go to the update page HERE, if necessary, to download the latest version.
If you DON'T own any Garmin mapping products, the update cannot be installed as it always checks to see if there is an existing previous version.
Viewing the contour maps:
Start Mapsource, and use the menu: “View” > “Switch to product”. You should see Contours as an option to be selected. Or, you can use the “Select a product” pull-down box, if it's visible.
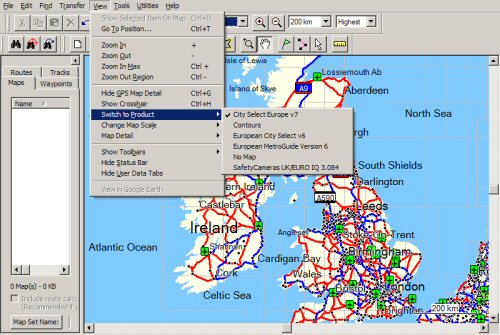
You can now see the contour maps themselves. At this point, it might be useful to point out some things about what you can see displayed, and how Mapsource uses the data...
The view in Mapsource on the PC is NOT necessarily what will be displayed on your GPSr screen. Mapsource uses an overview map, which contains all the relevant features. (For the techies, it's called Contours V2.img)
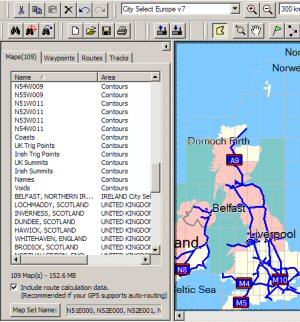
The contours package includes overlays for: trig points (GB and Irl), summits (GB and Irl), placenames, a general coastline, and voids. Voids are areas where the original radar mission did not record information and are shown as white polygons on the map...
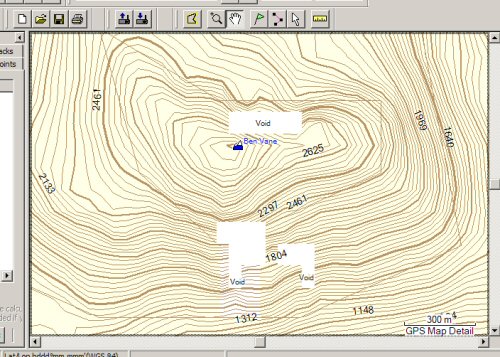
With the introduction of "Contours V2", there are fewer of these voids and they don't cause a problem. . The “trig points” overlays are quite accurate, but the corresponding “summits” are a work-in-progress: as anyone who has climbed mountains knows, it's often difficult to establish exactly where the true summit is!
Selecting maps:
Early users of the Contours package often abandoned it, because they thought that the maps were not “transparent.” This problem arose from a misunderstanding about how Garmin-type maps work, when loaded into a GPS. We don't have to make a choice between City Select (for example) and Contours – both can co-exist together.
On most Garmin receivers, the detailed mapping is loaded into the GPS units as one large file – very often named GMAPPSUPP.IMG Each map is composed of pre-defined sections, called “tiles”. Using Mapsource, we have to select ALL the map tiles which we want displayed on the GPSr in a single session.
|
This is done by making map tile selections from each product in turn, switching between them as necessary. It's a bit fiddly, as there is no way to see all the tiles on one visual display – however Mapsource does keep a list of the tile names, in the left-hand user pane. In the partial screenshot on the right, you can see that I've already selected some tiles from Contours, including the general overlays (summits, trigs, etc), and now I'm adding detailed road map tiles from City Select 7. The tiles for Contours tend to be larger than those for the road maps, so there aren't so many of them to pick out. You can also use the technique of zooming out the overview map, and “sweeping” with the left mouse button held down, to select whole areas in one go.
|
|
If you are using “ordinary” Garmin maps which have quite a lot of detail – such as City Select 7 – you might want to consider leaving some of the maps in Contours out of your selection. Specifically, the “Names” tile can be removed (because CS7 has plenty of place names included), and the “Coasts” tile can also be left out, if you're happy with Garmin's own (less accurate) version.
When making up your selection in this way, keep an eye on the total amount of GPS memory being committed. Garmin have not yet discovered that memory is cheap, and their units tend to be under-equipped. The contour tiles vary a great deal in the amount of memory they take up: a tile for East Anglia sizes at 637KB, whereas the same area in mid-Wales is over 4.0MB!
Uploading to GPS:
Once the map selection is complete, I suggest that you save (File Save As...) your work as a Mapsource .GDB file, with some meaningful name. If you have to re-load the GPS at some future date, it's often difficult to remember which maps were in there. Because my old eTrex doesn't have much memory, I keep a number of these prepared “selections” under different names, so that I can set the unit up quickly before (for example) a trip to Scotland.
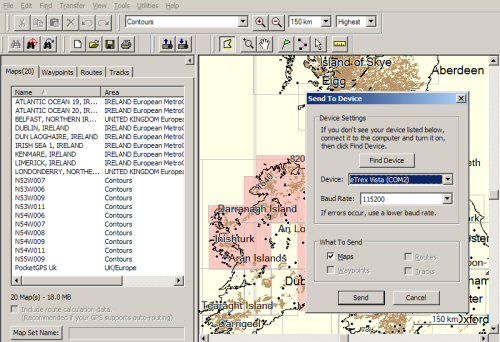
Make sure than your GPS unit is (a) connected to the PC, and (b) switched on. Now click on menus “Transfer” > “Send to device” and make the appropriate choices for the unit. (If you have an iQue 36xx and a fast USB card reader, Mapsource will detect the card if you insert it.)
Mapsource will now start chuntering away, building and indexing the new map. Even on a fast PC, a large build can take some minutes so it's a good time for a coffee break. Transfer of the maps over a serial (COM port) connection can be very slow – more modern GPS units (those with a USB interface) are much more amenable. If a very large map selection (such as for an iQue) is being compiled, I strongly suggest that no other applications are run on the PC while it's doing this task.
If Mapsource complains or generates an error message during the build, the most likely explanation is that one of the contour files is missing. Go back to page2, and check that all the downloads were completed and extracted correctly.
When the files have been successfully installed, we can take a short look at using Contours on a typical Garmin GPS unit....
![]()
|
Contents.... |
|
|---|---|
|
Page 4: |
|
|
|
|
|
Page 1: |
|
|
All text and images on this website are ©Paul McMichael 2005, and may not be copied or reproduced. We sue. “Mapsource”, “iQue”, “eTrex” are registered trademarks of Garmin Inc. |